
In this quick tutorial you'll learn how to draw a Duiker in 7 easy steps - great for kids and novice artists.
The images above represent how your finished drawing is going to look and the steps involved.
Below are the individual steps - you can click on each one for a High Resolution printable PDF version.
At the bottom you can read some interesting facts about the Duiker.
Make sure you also check out any of the hundreds of drawing tutorials grouped by category.
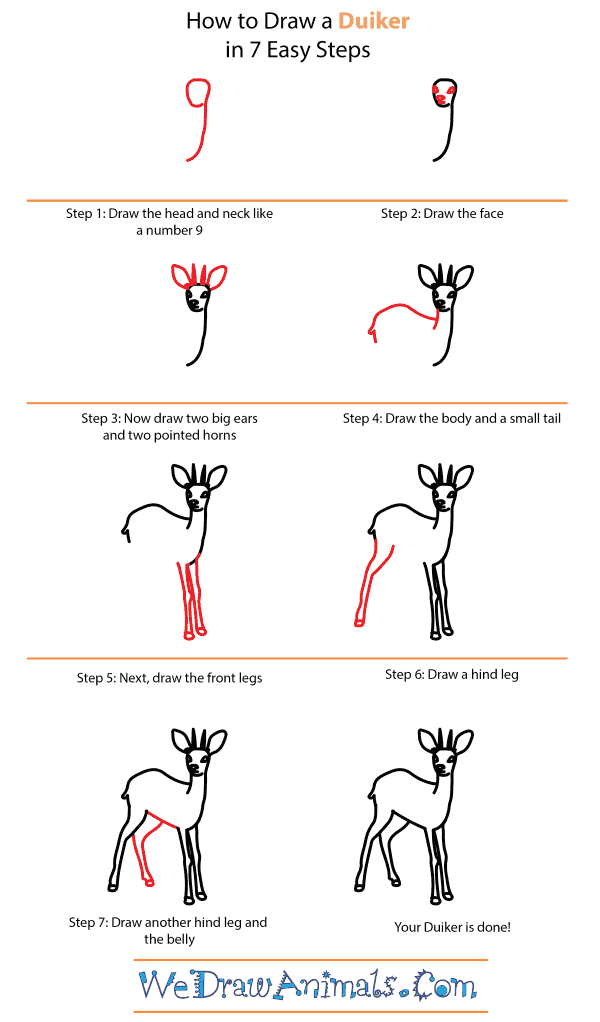
How to Draw a Duiker - Step-by-Step Tutorial

Step 1: Begin by drawing a roughly circular head and neck that resemble the number 9.

Step 2: Add the eyes and nose to the face.

Step 3: Now, draw two big ears on the tops of the head, and two large horns between them.

Step 4: Draw the other side of the neck and then add a body and small tail.

Step 5: Draw the two front legs. They should be long, with knobby knees.

Step 6: Now, draw the first hind leg in the same fashion.

Step 7: Make a line connecting the underside, add the final leg and you're all done.
Interesting Facts about the Duiker
The Duiker is a small antelope that is found in only specific parts of Africa, Eastern Liberia, Sierra Leone, and Ivory Coast. It is hunted by the local people for its meat, because a single Duiker can be up to forty-four pounds. Both the males and females have horns, which are used to defend their territory because they are extremely territorial.
Did you know?
- They prefer thicker vegetation filled rainforests
- Population has declined 30% due to habitat loss
- The Duiker is listed as “Vulnerable” on the endangered species list
- Young Duiker are bluish in color
- They are herbivores – eating buds, grass, fruit, and leaves
Lesson Plan Idea – Why are the Duiker being hunted so much? If there are breeding pairs then why has the population gone down 30% in only a few years? Are there other options for food that would protect this species?
How to Draw a Duiker – Step-by-Step Tutorial