
In this quick tutorial you'll learn how to draw a Swift in 6 easy steps - great for kids and novice artists.
The images above represent how your finished drawing is going to look and the steps involved.
Below are the individual steps - you can click on each one for a High Resolution printable PDF version.
At the bottom you can read some interesting facts about the Swift.
Make sure you also check out any of the hundreds of drawing tutorials grouped by category.
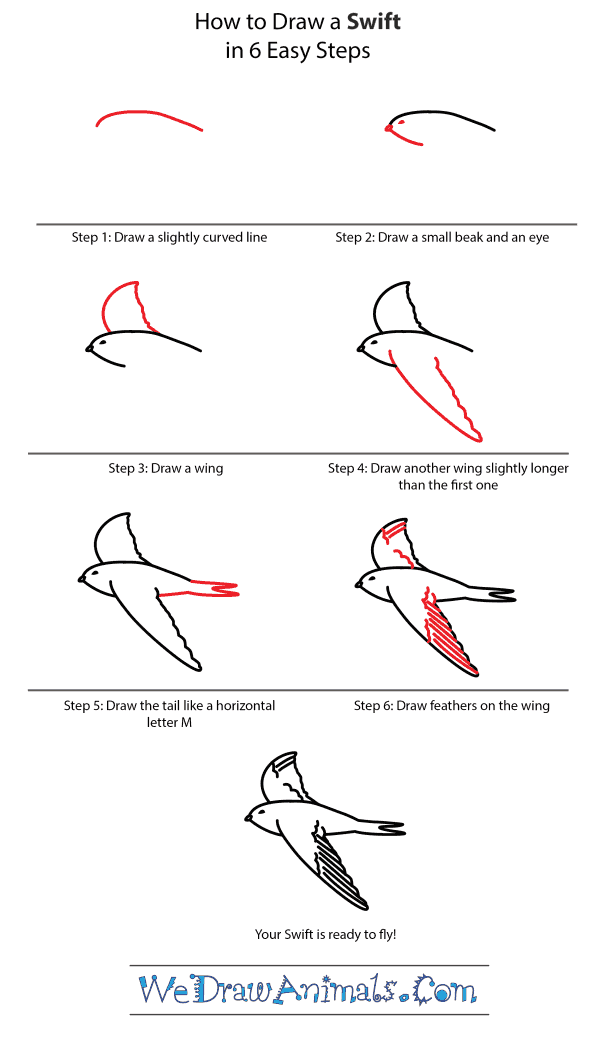
How to Draw a Swift - Step-by-Step Tutorial

Step 1: Draw a small, slightly curved line.

Step 2: Add a very tiny beak and an eye to the face.

Step 3: Now draw a wing extending from one side of the body.

Step 4: Add a second wing that is slightly longer than the first one, toward the front of the bird's body.

Step 5: Now draw the tail. It resembles the letter "M."

Step 6: Finish up by adding details to the wings' feathers.
Interesting Facts about the Swift
Consisting of more than seventy-five different varieties, the Swift specie can be found throughout the world. – that is except polar regions and some countries in the Southern Hemisphere. They are closely related to hummingbirds. Depending upon the variety. Some Swifts are considered endangered. The swift spends a majority of its life in the air – it eats, mates, sleeps, and drinks while flying.
Did you know?
- The Swift belongs to the Apodidae family
- They have bristles above their eyes that act as sunglasses
- Diet includes spiders, mosquitoes, beetles, and flies
- Can fly at heights of ten thousand feet
- Their predators include hobbies, falcons, and kestrels
Lesson Plan Idea – Using diagrams, migration patterns, maps, and facts – compare and contrast the hummingbird to the Swift. What are the major differences? Do they cross paths during any migrations? What about their diets?
How to Draw a Swift – Step-by-Step Tutorial