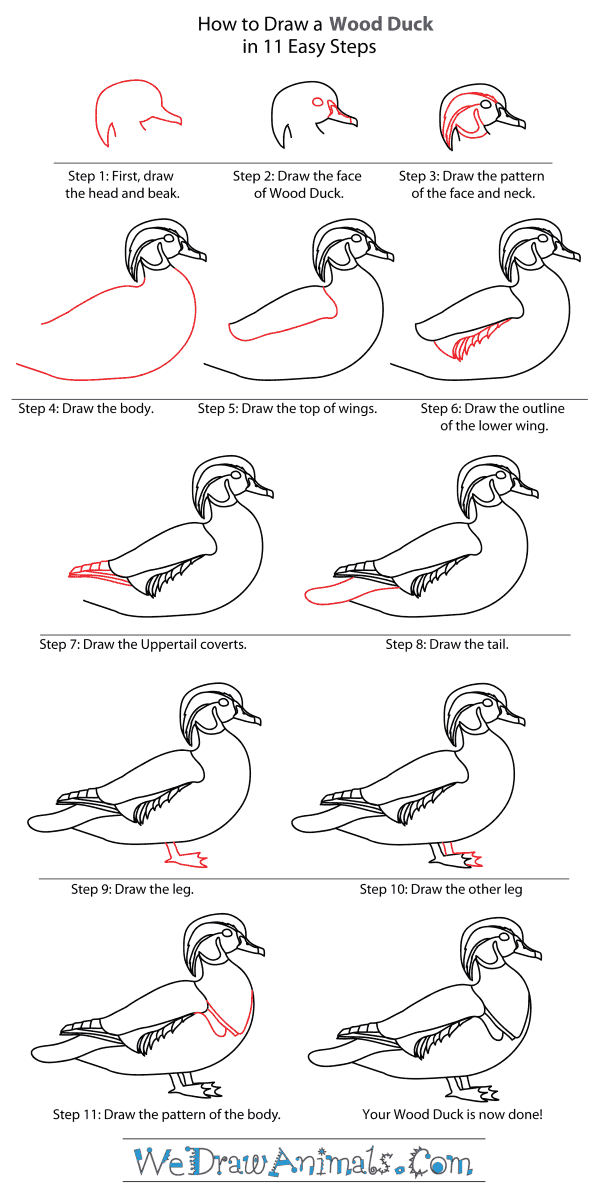
In this quick tutorial you'll learn how to draw a Wood Duck in 11 easy steps - great for kids and novice artists.
The images above represent how your finished drawing is going to look and the steps involved.
Below are the individual steps - you can click on each one for a High Resolution printable PDF version.
At the bottom you can read some interesting facts about the Wood Duck.
Make sure you also check out any of the hundreds of drawing tutorials grouped by category.
How to Draw a Wood Duck - Step-by-Step Tutorial
Step 1: To start the drawing of your Wood Duck, you will want to draw the duck's head. To draw its head start with a curved line and add the front and back features shown above using straight lines.
Step 2: Next you will want to draw the Wood Duck's face. Draw a circle for the eye and draw a curved line to section off the beak.
Step 3: Now you will need to draw the pattern on the head and neck. Using curved and straight lines create the pattern as shown above.
Step 4: The next step is to draw the body. Draw the front of the body by drawing a rounded line coming from the front of the head down and around the bottom. For the back, draw an angled line coming out from the back of the head.
Step 5: Now draw the top of the wing by using straight lines to create a rectangular shape on the top of the back.
Step 6: Next draw the lower part of the wing. Use curved lines that come together at points attached to the lower part of the wing.
Step 7: For the next step, draw the upper tail coverts. Draw a four stepped pattern of rectangular shapes to create the coverts.
Step 8: Now you will need to draw the tail. To create the tail, draw two curved lines coming out of the back of the body.
Step 9: The next step is to draw the leg. Create the foot with a triangle shape with three points and attach with two straight lines for the leg.
Step 10: Draw the other leg the same as the first behind it.
Step 11: Finally you will want to draw the pattern of the body. Use straight lines that come together at points on the chest to create the pattern above. You have now drawn a Wood Duck.
Interesting Facts about Wood Ducks
A Wood Duck can be found on the North American west coast and western Mexico. They are found in swamps, shallow lakes, marshes, ponds, and creeks. They eat berries, acorns, seeds, and insects. The average adult is 19 to 20 inches long and has a 26 to 29 inch wingspan. Wood Ducks are known as the most colorful water fowl in North America. Wood Ducks are special because of their unique features and mating habits. They are the only North American duck that can have two nests of eggs in a mating season. Sometimes female Wood Ducks will “dump” their eggs into another female’s nest. The other female will raise those eggs as well as her own. Wood Ducks are very popular for hunting, but most areas only allow hunters to shot two a day of the hunting season.
Did you know?
- The Wood Duck is also known as the Carolina Duck.
- Males have shiny brown and green feathers with a white band around their necks.
- Wood Ducks are a rare type of duck that have claws instead of web feet. This makes them a “perching” duck.
- A duckling can jump 290 ft. and be completely fine.
- As many as 7 to 15 eggs are laid during mating season.
Activity: Here is a great indoor recess idea for grade school children. Draw a large picture of a wood duck on a poster size piece of paper. Next color the picture to look like a wood duck, except the bill. Then cut out a “duck bill” (and a few extras in case the game gets too rowdy) out of construction paper. On game day, post the poster up on a wall in the classroom. Finally, each student should take turns blindfolded and play “pin the bill on the duck.”


