
In this quick tutorial you'll learn how to draw a Moorhen in 7 easy steps - great for kids and novice artists.
The images above represent how your finished drawing is going to look and the steps involved.
Below are the individual steps - you can click on each one for a High Resolution printable PDF version.
At the bottom you can read some interesting facts about the Moorhen.
Make sure you also check out any of the hundreds of drawing tutorials grouped by category.
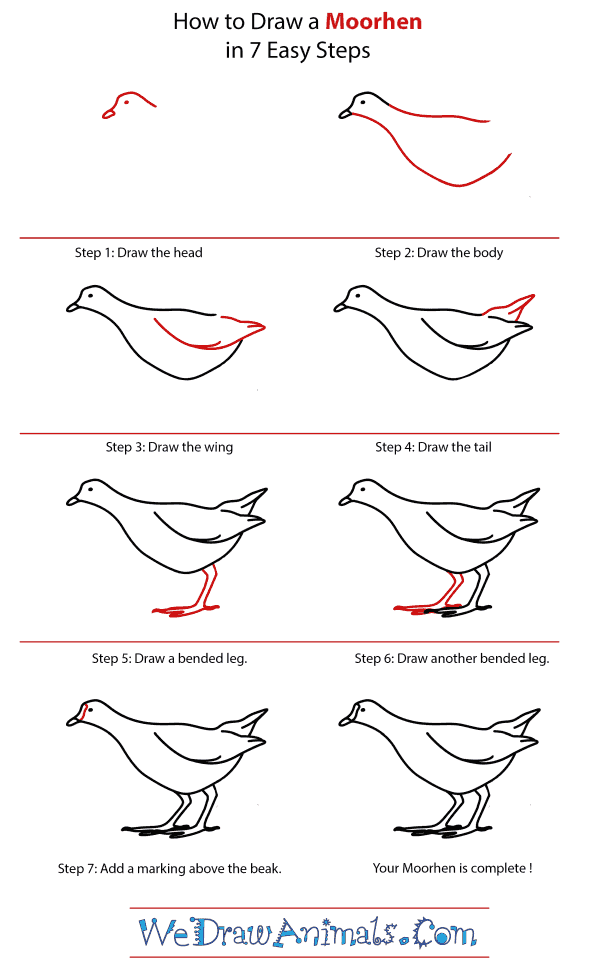
How to Draw a Moorhen - Step-by-Step Tutorial

Step 1: Draw a curved head with a small beak and eye.

Step 2: Draw the body, using two large, curved lines.

Step 3: Now draw the wing extending from the middle of the body toward the back.

Step 4: Add a small feathery tail to the back.

Step 5: Add the first leg, which is long and thin with a bent knee and flat foot.

Step 6: Add a second leg beside it, drawing it in the same fashion as you drew the first one.

Step 7: Add a marking over the eye of the bird and you're finished with this drawing.
Interesting Facts about the Moorhen
Moorhens are found in areas with just the right temperatures – never to be found in extreme cold or extreme tropical climates. They inhabit marshes, streams, and ponds but have had devastating habitation loss regarding the wetlands. It has become so bad that some species of Moorhen have actually become extinct. They are poor flyers, with some varieties being practically flightless.
Did you know?
- There are ten different species of Moorhen
- They are omnivores
- Moorhen are known as the “Swamp Chicken”
- Diets consist of worms, fish, seeds, insects, fruit, and plants.
- Mating season is April thru August
Lesson Plan Idea – Using a map, have your class map out where the different species of Moorhen dwell (or did dwell). Where they are extinct, discuss why this came to be and what could have been done to prevent it.
How to Draw a Moorhen – Step-by-Step Tutorial