
In this quick tutorial you'll learn how to draw a Realistic Dog in 8 easy steps - great for kids and novice artists.
The images above represent how your finished drawing is going to look and the steps involved.
Below are the individual steps - you can click on each one for a High Resolution printable PDF version.
At the bottom you can read some interesting facts about the Realistic Dog.
Make sure you also check out any of the hundreds of drawing tutorials grouped by category.
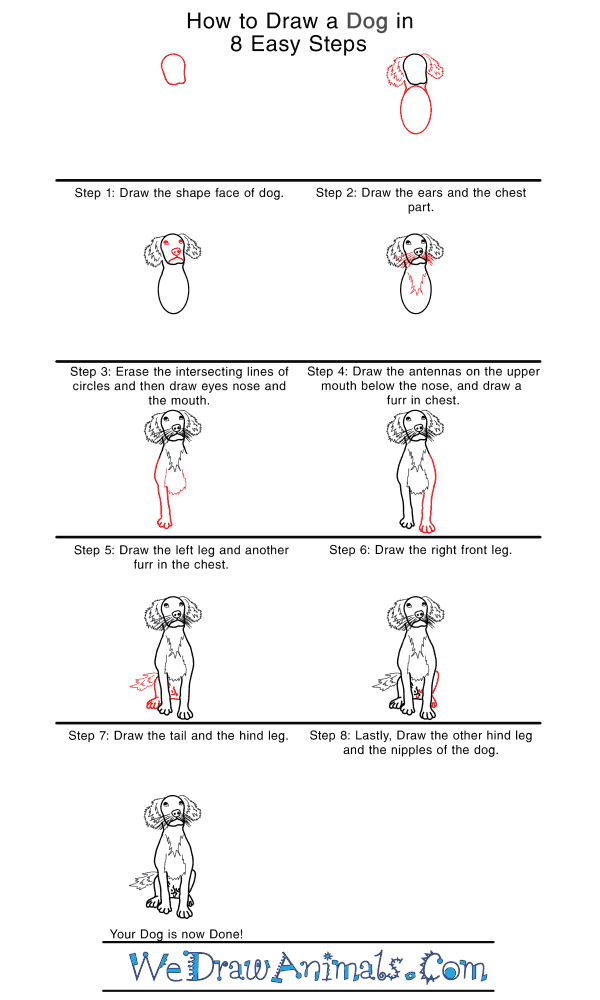
How to Draw a Realistic Dog - Step-by-Step Tutorial


Step 1: First you'll draw an oval shape with a flat bottom for the head.

Step 2: Then you'll draw the wide, furry ears and an oval for the chest, making sure to connect it to the head.

Step 3: Next erase the top part of the oval for the chest and then draw in the face with a triangle nose just above the mouth and eyes just below the tops of the ears.

Step 4: Then draw the whiskers on each side of the nose and above the mouth and a “V” shaped section of chest fur.

Step 5: Next you'll draw in the leg and paw on the left side of the chest and add in a bit more fur in the shape of an upside down “U” as well as making the bottom of the chest furry and erasing the intersecting line at the top of the leg.

Step 6: After that you'll draw in the other front leg and paw with its toes and erase the intersecting line at the top of the leg.

Step 7: Then draw the hind leg on the left side and the middle part of the belly between the front legs and add the bushy tail just above the knee of the hind leg.

Step 8: Finally, draw the other hind leg and add the teats to the belly.

Step 9: Your Dog is finished! Congratulations!
How to Draw a Realistic Dog – Step-by-Step Tutorial