
In this quick tutorial you'll learn how to draw Olaf From Frozen in 7 easy steps - great for kids and novice artists.
The images above represent how your finished drawing is going to look and the steps involved.
Below are the individual steps - you can click on each one for a High Resolution printable PDF version.
At the bottom you can read some interesting facts about the Olaf From Frozen.
Make sure you also check out any of the hundreds of drawing tutorials grouped by category.
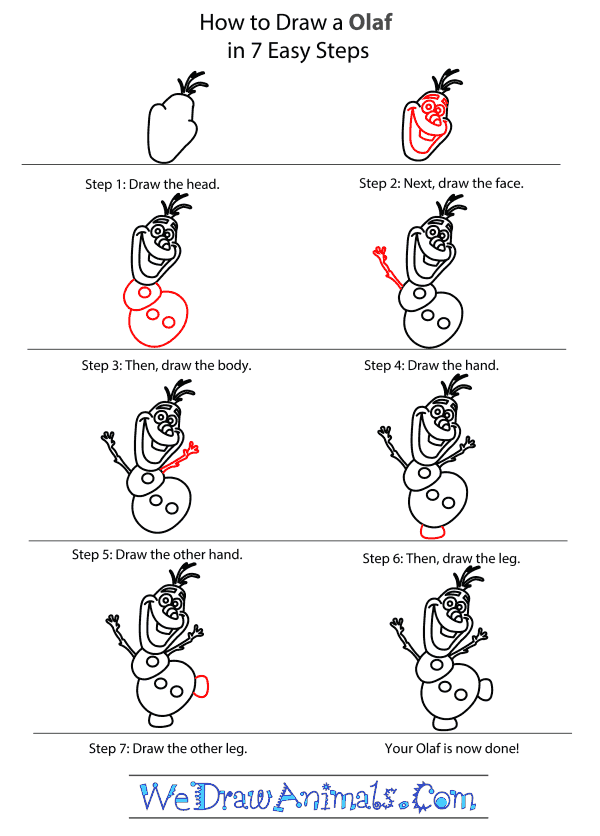
How to Draw Olaf From Frozen - Step-by-Step Tutorial

Step 1:

Step 2:

Step 3:

Step 4:

Step 5:

Step 6:

Step 7:
Interesting Facts about OLAF from Frozen
Olaf is a member of the Disney casting group from the largest retail franchise in the world. The characters began being designed during 1923 in Los Angeles by Walt Disney, an American illustrator. They were featured in live-action film production, television, and theme parks. The sensation inspired an expansion of its existing operations and making an addition of theater, radio, music, publishing, and online media.
Did you know?
- This character first appeared in the 2013 movie Frozen.
- He is a snowman with 3 white body segments, 3 lumps of coal for buttons, 2 tree branches for arms, 3 twigs for hair, 1 carrot for the nose, and an upper central tooth.
- The snowman is built by Anna and her sister Elsa.
- Elsa later becomes an ice queen, and her magic breathes life into the snowman.
- Olaf helps Anna find her sister over the North Mountain and then they visit the valley of the trolls.
The Disney company is well known for their products of its film studio. They own such television networks as ABC, A&E, ESPN, and Disney Channel. Other acquisitions involve merchandising, Dow Jones membership, and 14 theme parks around the world. While there are many characters associated with them, the first creation within the business was Mickey Mouse, now the symbol of The Walt Disney Company.
How to Draw Olaf From Frozen – Step-by-Step Tutorial