
In this quick tutorial you'll learn how to draw a Pear Tree in 5 easy steps - great for kids and novice artists.
The images above represents how your finished drawing is going to look and the steps involved.
Below are the individual steps - you can click on each one for a High Resolution printable PDF version.
At the bottom you can read some interesting facts about the Pear Tree.
Make sure you also check out any of the hundreds of drawing tutorials grouped by category.
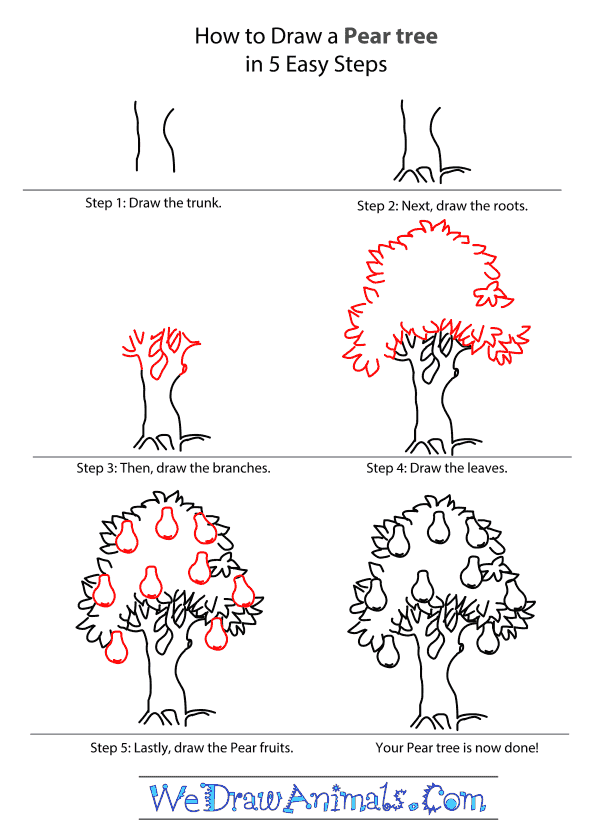
How to Draw a Pear Tree - Step-by-Step Tutorial

Step 1: First, draw the trunk. Draw a long straight line. Leave a wide space and draw another line that curves inward toward the top and back out.

Step 2: Next, draw the roots. At the end of both sides of your trunk, draw a diagonal line coming out. Now draw two upside down “V’s” inside of the two lines you just drew.

Step 3: Now, draw the branches. At the top of the right side of your trunk, draw a small skinny oval. At the top of this oval, draw a line that curves outward. At the end of that line, draw an obtuse “V” and connect a curved long “V” to that. Leave a little space and out line the curved long “V” and curved line going down. Do these steps to the left side of the trunk but leave out the small oval, instead just start the curved line from the top of the trunk.

Step 4: Now, draw the leaves. Outline the top of your branches with fat spikes that are upside down and connect all in a line. Continue drawing the fat spikes in a circle shape around the top of the branches.

Step 5: Lastly, draw the Pears. To draw a pear, draw an upside down half circle and half of a rectangle to close up the half circle. Continue drawing the pear fruit all throughout your leaves.
Interesting Facts about Pear Trees
Pear Trees are a common fruit bearing tree that has become a stable in most orchards. Pear Trees can grow up to 20 feet tall and are pretty tough. They start out as cone shape, but branch out as they get older. The leaves are oval shaped with toothy edges. In spring, they produce large clusters of small white flowers. When the tree’s fruit appears it is a small green pear-shaped knob. Soon the pears begin to turn shades of yellow, darker green and even tan. It takes 4 years for a Pear Tree to produce fruit.
Did you know?
- Pear Trees should be pruned every year so they will produce more fruit.
- There are 800 pieces of Pear Tree.
- Pears continue to ripen when plucked off the tree, and can be stored away in boxes and other dark and dry places.
- Despite all the species there are only 2 types of Pears: the European and the Asian.
- Plan for an expanding canopy by spacing pear trees out 25 feet from each other. This way the trees have room to spread out and grow.
- Wooden spoon makers like to use Pear Tree wood because it doesn’t affect the taste of food.
Activity: If possible, visit a pear orchard. If it isn’t possible, then find you favorite pear recipe and serve it for snack.
How to Draw a Pear Tree – Step-by-Step Tutorial